😋 主题重构引发的一连串事件

前言
隔了一段时间没有写✍️博客,后面不小心通过了Adsense,准备把博客重新整理下,删掉了之前的文章,因为加了广告,有些话题不合规,为了避免这个麻烦👿,我就隐藏了一些不太合适的文章,广告用的自动广告,可能页面的哪个都会出现,越用越发觉这个主题(也就是cactus)需要做一些调整。
重构主题
原来的主题cactus https://github.com/probberechts/hexo-theme-cactus属于小清新风格,里面布局用的ejs,样式用的styl,说实话,你让我一个用React和Sass开发了这么些年的人再使用相对落后的技术栈来开发和维护,效率确实会很低。
当然ejs也比较容易理解,但是写起来没有那么顺畅,比如ejs里面使用变量:
1 | <article class="post" itemscope itemtype="http://schema.org/BlogPosting"> |
看上去很好理解,但写起来就很麻烦,所以我计划淘汰这些老旧的技术栈,重构这个主题。采用的技术栈包括:
- react
- tsx
- sass
所以重构的第一步就是将ejs重写成tsx,hexo要处理模版,需要安装模版处理器,有jsx的模版处理器hexo-render-jsx,所以我fork了原来的仓库,添加了对tsx的支持,改动不大,主要是两处
第一处是在index.js文件里面,注册了对tsx文件的处理
1 | hexo.extend.renderer.register('tsx', 'html', renderer, true); |
第二处是在compile.js里面添加了对tsx的处理
1 | require('@babel/register')({ |
至于将ejs转换位tsx这种重复的工作,就交给copilot了,转换的还可以。
风波未平
事情到这里,远远没有结束,虽然ejs的源码全部转换成了tsx,也可正常显示。但是每次修改主题,不能自动刷新就算了,刷新的后还是旧的内容,这实在不能忍😓,这样开发主题,效率会异常低下,没有热更新就算了,起码刷新后得是新的内容吧。每次修改后都得执行hexo s。
我的要求很简单,就是文章和主题修改后都能自动刷新,并且刷新后是新的内容。本着能不动手就不动手的原则。采取的第一个解决方法是用外部的命令监听某个目录,这个目录的文件修改后,自动执行命令。这个方法用的nodeman,安装完成后执行
1 | nodemon -e tsx --exec 'hexo server' |
用了一下,发现确定很明显,hexo-browsersync的自动刷新失效了,这也难怪,毕竟每次修改都重新启动了,会起作用就有鬼了。并且这种方法资源消耗大,属于不得已而为之。
我还是不想动手,那就网上找找看有没有相关的文章或者问题。找到两个问题比较相关
- hexo-theme-icarus的一个issue里面提出的,看起来好像是同一个问题,但是看他们的对话明确提出不准备解决 🥵
- hexo-renderer-pug的一个issue里面的,采用的pug这种模版,解决方法是不设置renderer的compile字段,原理我后面看源码的时候会解释
不设置render的compile字段,这个在我的tsx的renderer里面没有效果,刷新还是旧的内容。
没办法👐,我只能自己动手了。首先把hexo的仓库fork到自己账户下面,然后在自己的博客目录,修改package.json里面的依赖改成本地路径
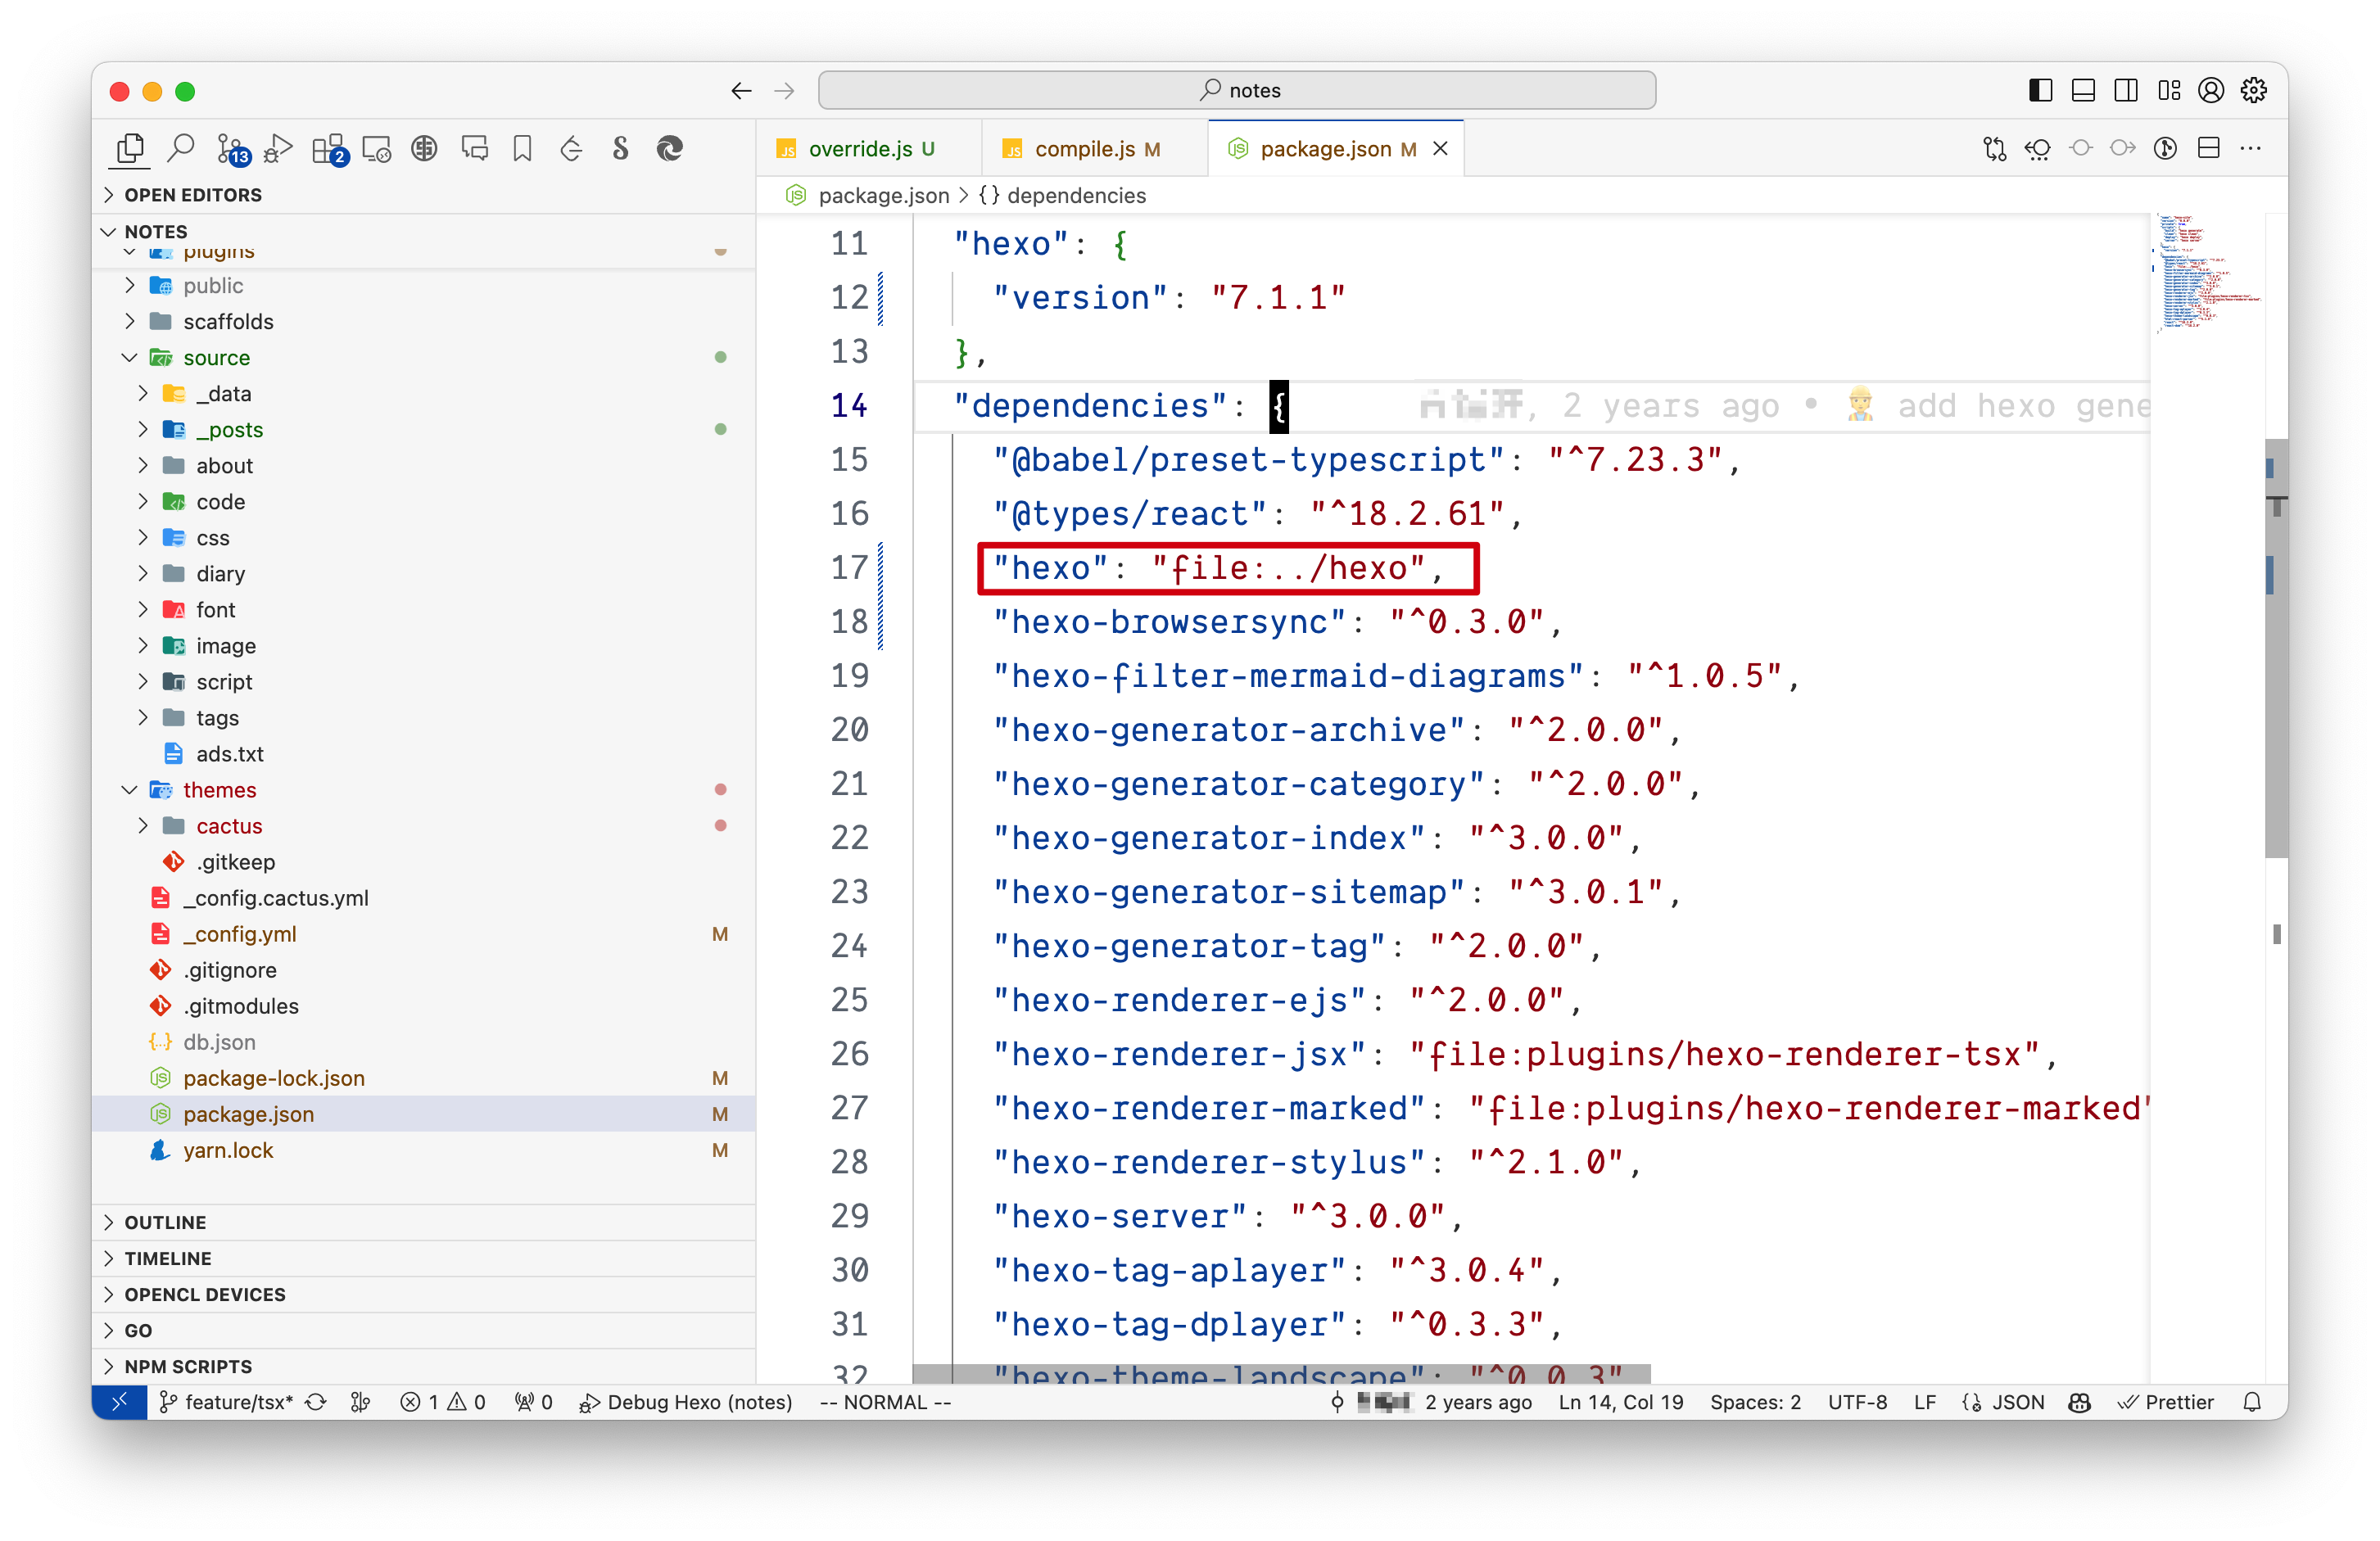
执行下面的命令重新安装依赖:
1 | npm i |
也就是采用本地包
初探秘境
使用hexo server命令,实际上是由hexo-server这个包提供的服务,但是页面渲染相关的逻辑是在hexo这个包里面。第一次看这个源码,没有头绪。先从日志寻找线索🕵️。
使用hexo server --debug会打印debug日志,hexo是用ts开发的,node没办法直接执行,是通过ts编译器编译成js,然后再由node执行,如果要直接调ts,需要用node-ts,不过我看了下hexo生成的js并没有混淆过,保留了程序的可读性。
下面就是对hexo源码进行调试,在vscode里面的debug添加下面的配置
1 | { |
点击运行,在浏览器上面打开页面,可以发现日志里面出现了Rendering HTML index

在js里面搜索相关字符串,然后我在这里添加了一个断点,我首先的弄明白这个tsx是转换成html的逻辑。说起来,这个断点的位置,下一行就是渲染的方法,🤣step in进去,看看👀里面做了些什么事情
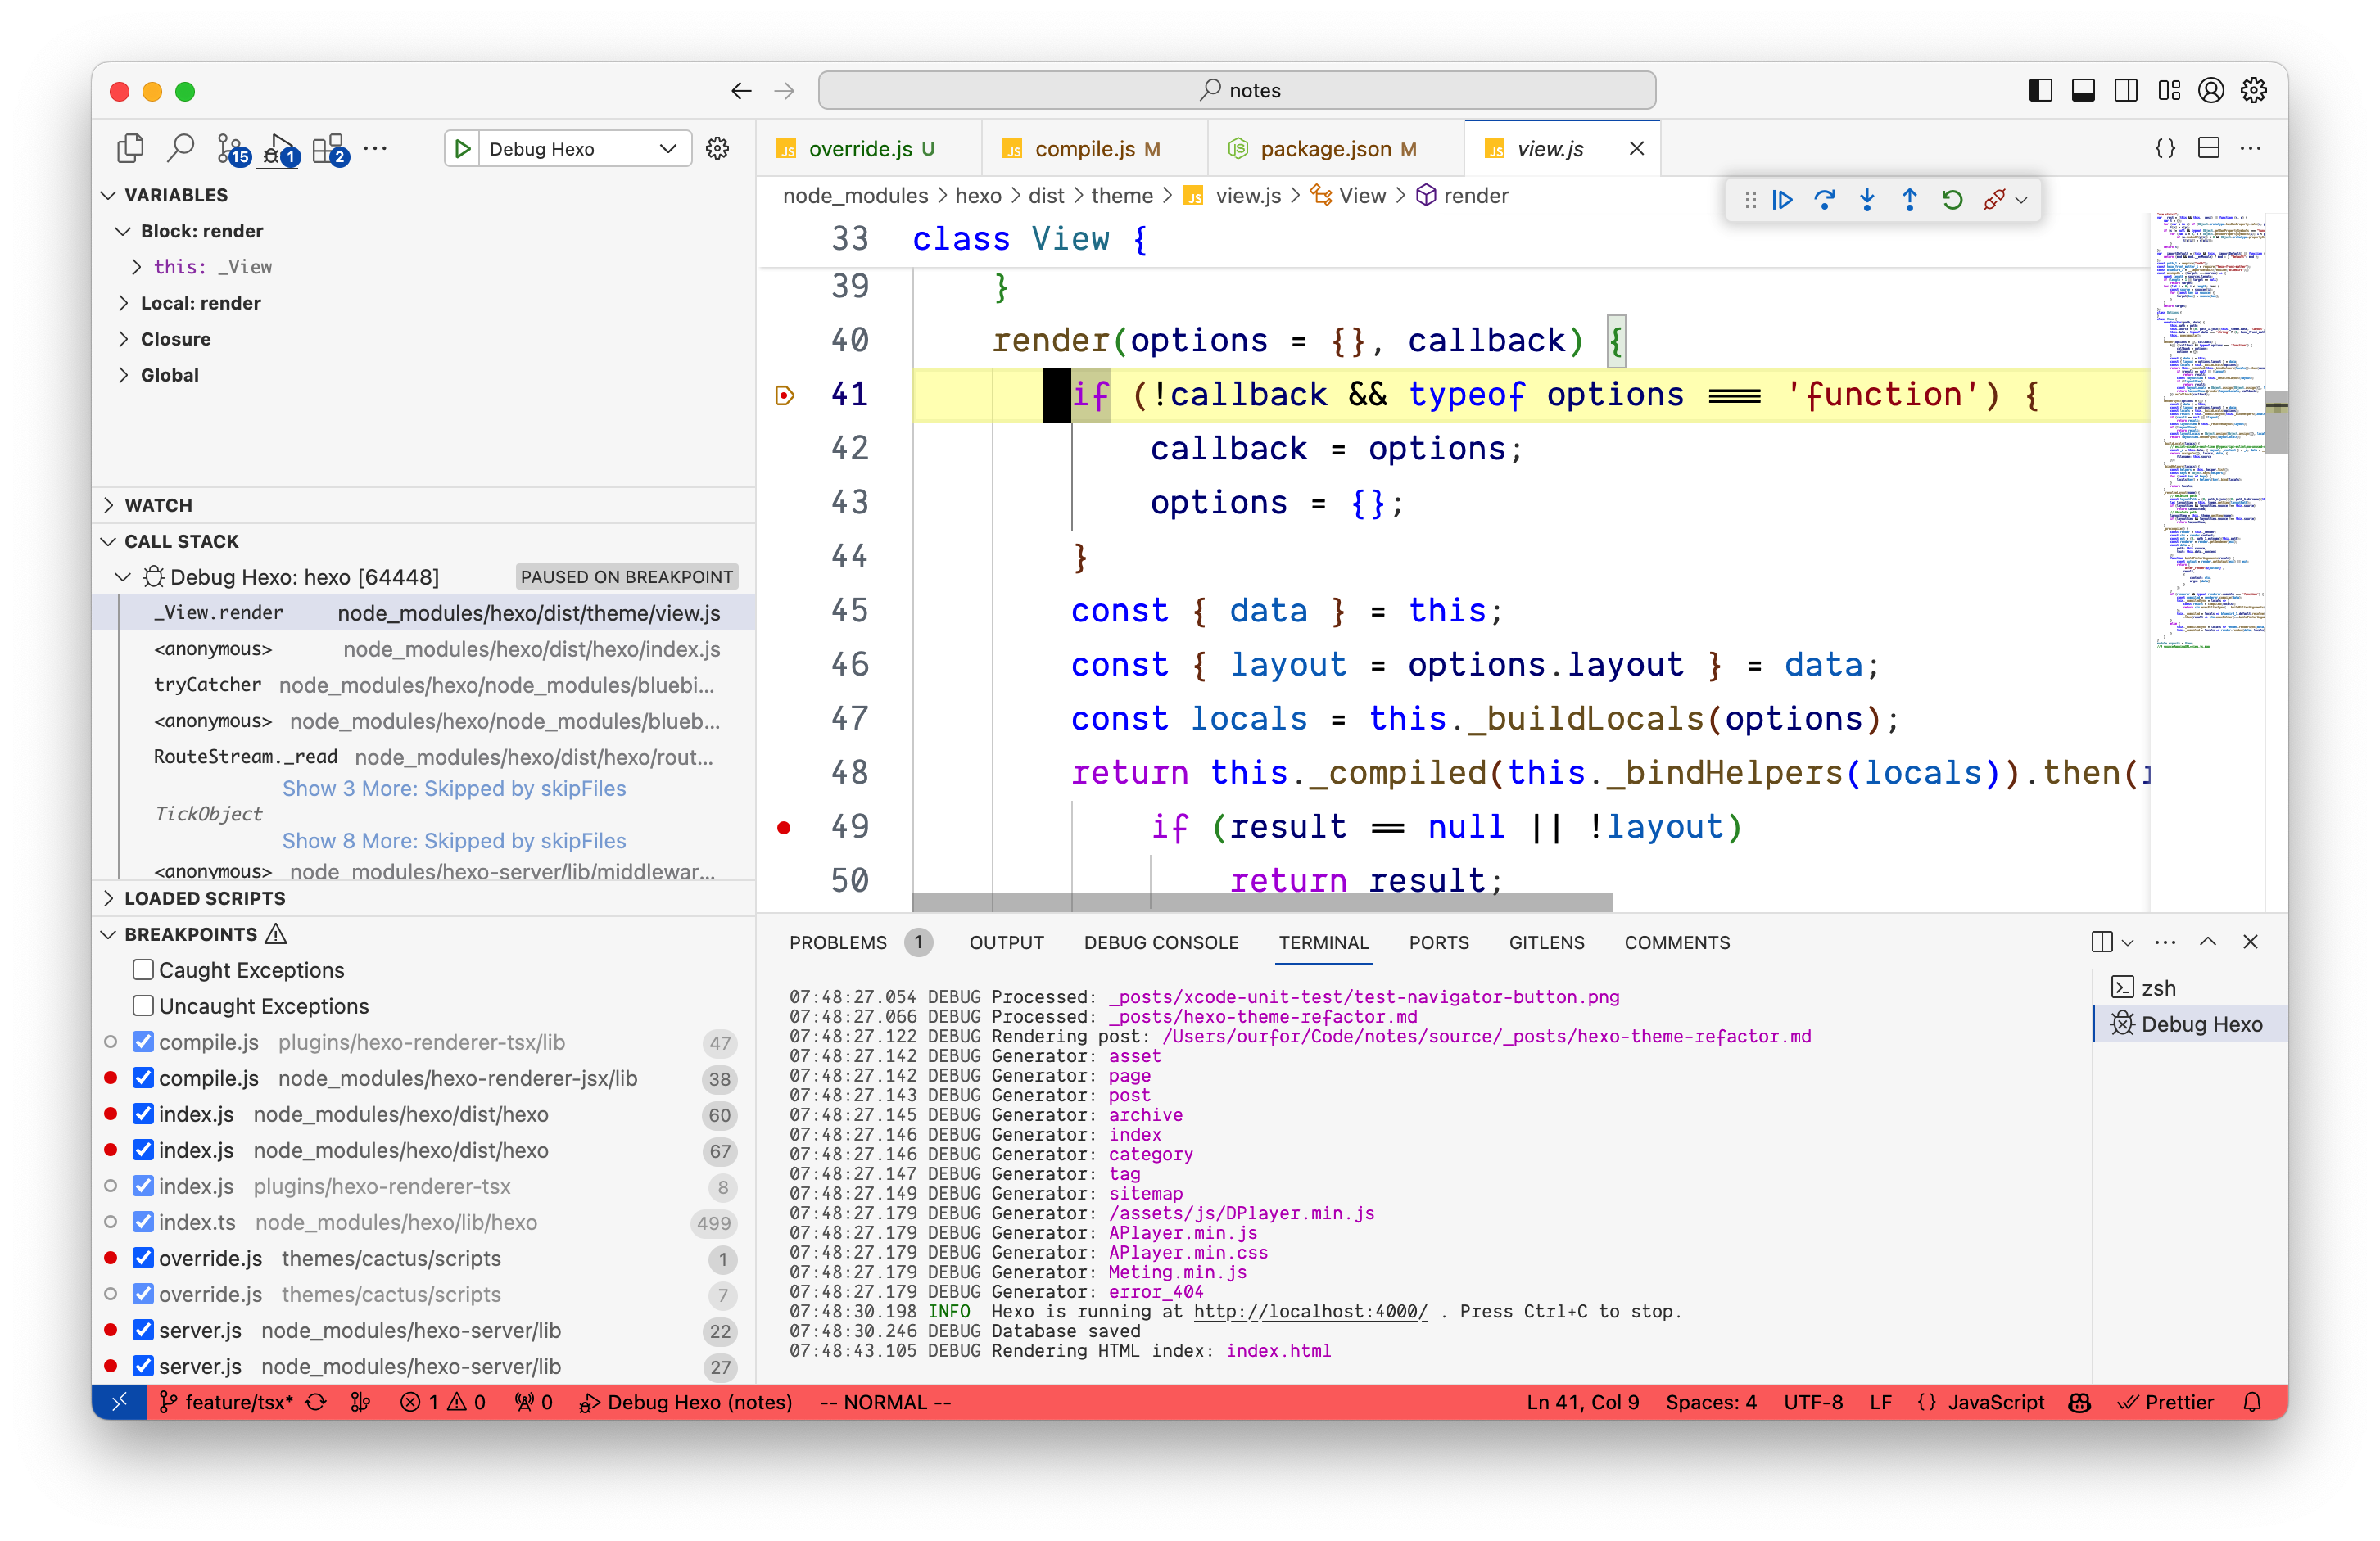
我在result这里添加了一个断点,点击continue以后发现,result的内容已经是html了
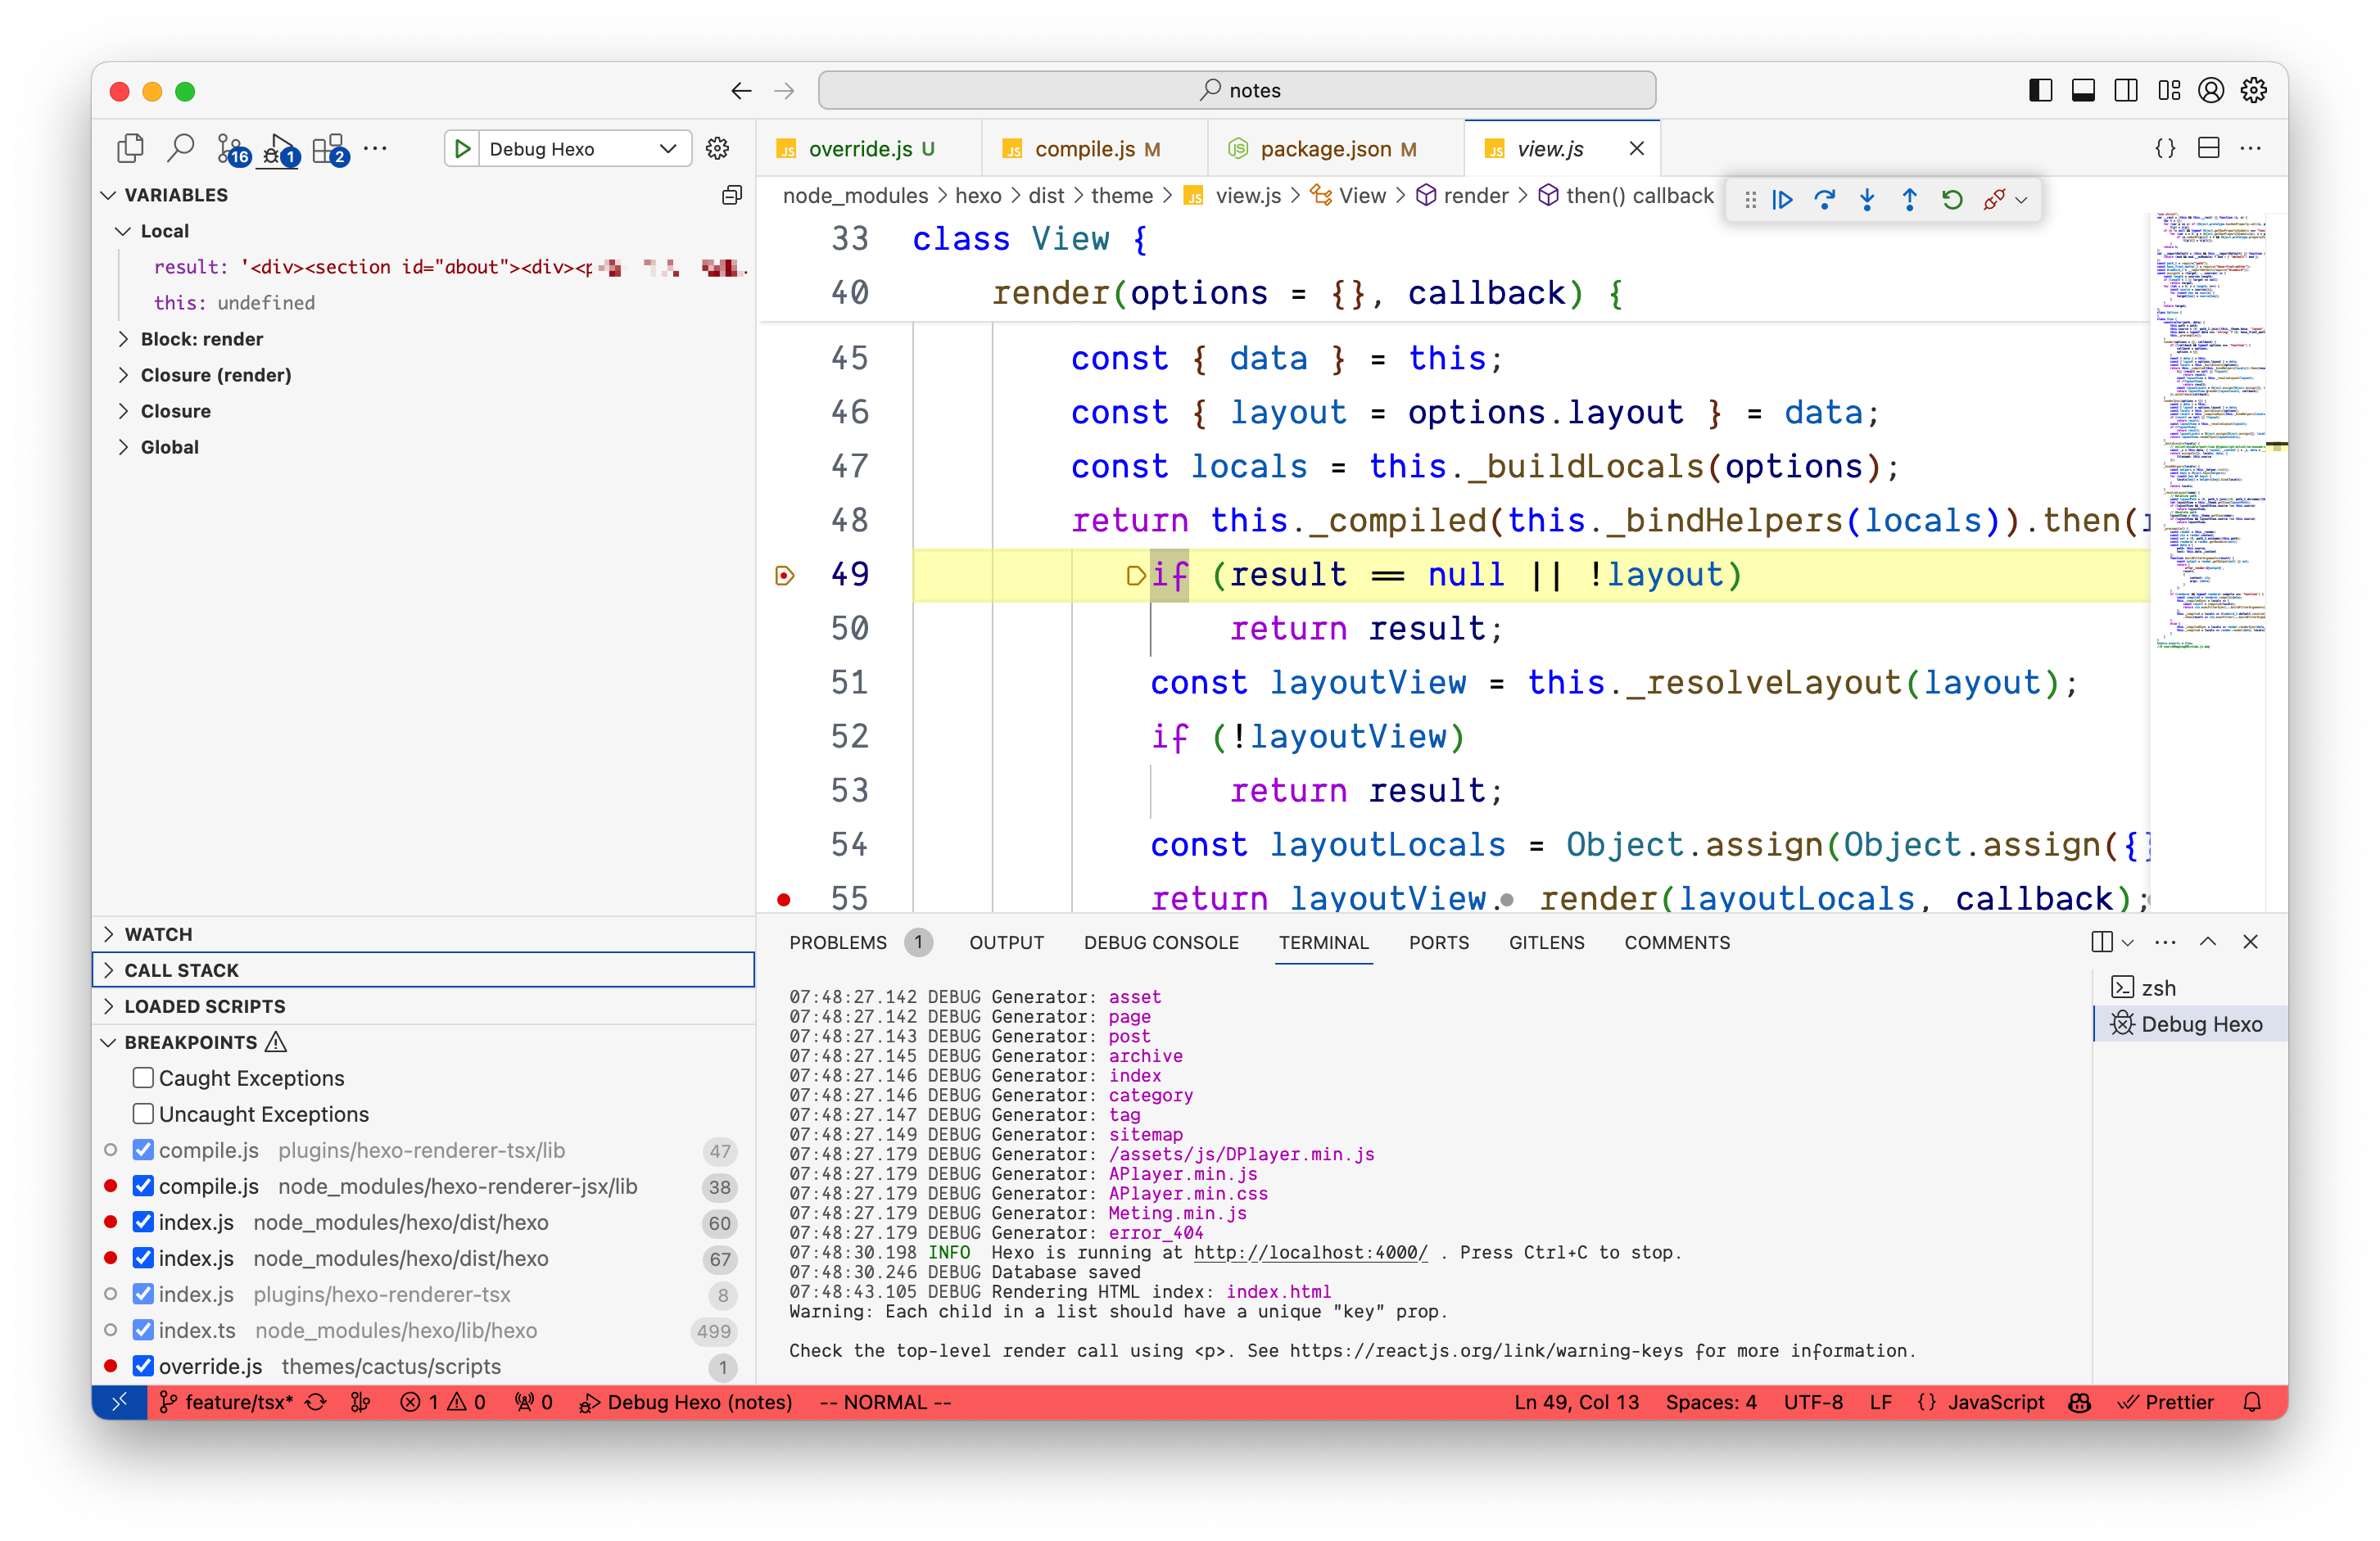
所有相关的转换逻辑就在_compiled这个函数里面,点进去看后发现_compiled是这样初始化的
1 | if (renderer && typeof renderer.compile === 'function') { |
前面提到的那个issue就行影响了这部份逻辑,在_compiled里面实际上是通过调用compiled函数来实现的,compiled函数就是renderer.compile(data)的返回值。
再回头看看我们的tsx的renderer
1 | const compile = require('./lib/compile'); |
里面直接返回的compile(data)(locals),这一部份的源码如下:
1 | function compile(data) { |
这个函数执行返回了一个闭包,里面的Component被缓存了下来,其中data.path就是tsx文件的路径。原来如此,因此第一步修改是将path缓存,Component在闭包里面初始化,也是就是下面这样
1 | function compile(data) { |
修改后再执行,没有效果❗️❗️❗️,怎么回事,突然想起,require函数有缓存的逻辑,因此我在Component下面添加了一行语句删除Component的缓存
1 | delete require.cache[require.resolve(path)] |
加上去以后,修改我的Footer.tsx组件发现没有效果,再看看日志只有重新渲染Index.tsx的日志,于是我在Index.tsx日志里面修改,发现有效果了。看这个样子,在好好梳理下。Index.tsx里面import了Footer.tsx,但是hexo只渲染了Index.tsx,删除require的缓存后,有效果,说明重新渲染了,断点发现也是如此。
再回头看看渲染的逻辑
1 | const Component = require(path); |
在require了Index.tsx的时候,Index.tsx里面依赖的其他tsx会被require缓存,但是我只删除了Index.tsx的缓存,Index.tsx修改后有效果,它依赖的组件还是缓存的旧的内容,所以继续进行修改,删除Index.tsx里面依赖的所以依赖的缓存
1 | function purgeCache(modulePath) { |
1 | const Component = require(path); |
重新打开,修改,效果出来了。
劫后余生
这样修改确实不太合理,比较并不是所有的依赖都有修改,实际上hexo会监听目录中的文件变化,在重新处理前会发出事件processBefore
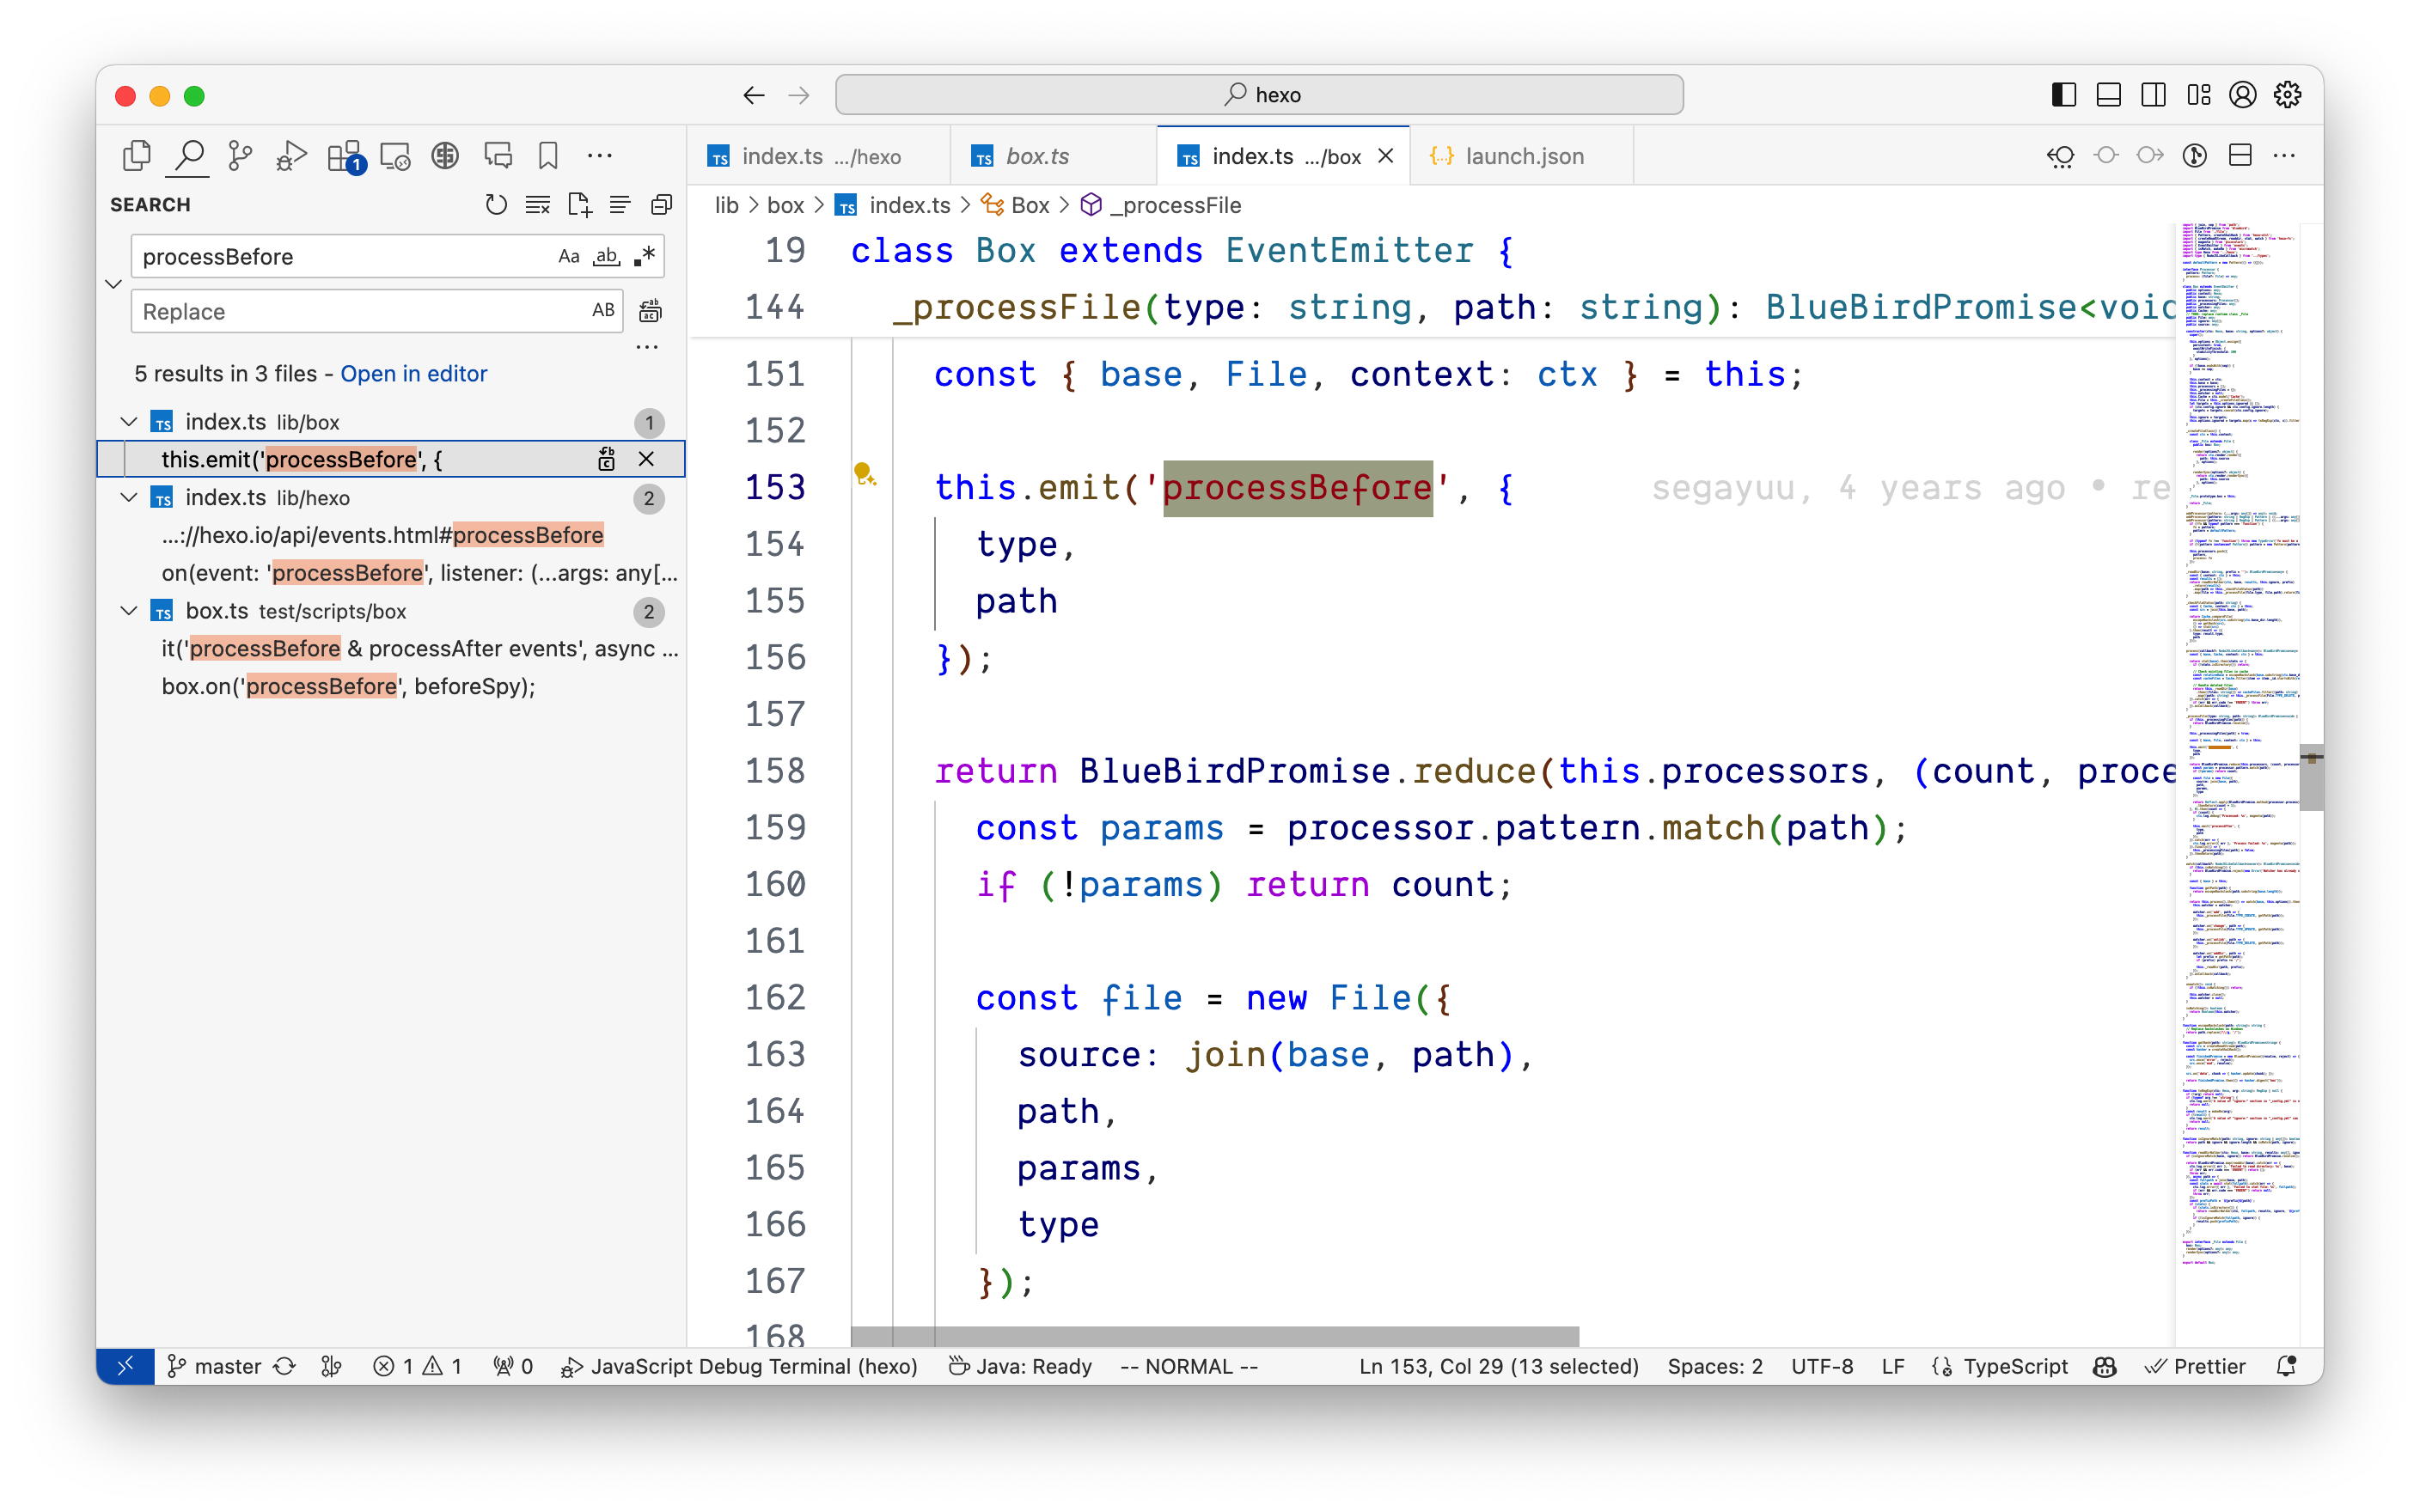
更新文件时type的值为File.TYPE_UPDATE,还会传递一个路径给回调函数。可以在这个回调事件里面删除更新了文件的require缓存。
- 本文链接: https://blog.saltpi.cn/article/hexo-theme-refactor/
- 版权声明: 本博客所有文章除特别声明外,均采用 ©BY-NC-SA 许可协议。转载请注明出处!